
Fall-planted garlic across Zones 5–7 is emerging now. Three problems — frost heaving, yellow foliage, and bulb rot — are easiest to catch and fix in the next 7–10 days. After that, the damage compounds.
Garlic planted last fall is breaking dormancy across USDA Zones 5 through 7 as soil temperatures climb above 40°F. According to Cornell Cooperative Extension, young garlic shoots cannot survive temperatures below 20°F without mulch cover, and early spring is when overwintering damage becomes visible for the first time. The next two weeks are the narrowest window to identify problems and intervene. A clove that heaved out of the soil, a shoot showing systemic yellowing, or a bulb softening underground — each has a different fix, but all three share one thing: waiting until April cuts the chance of a full-sized July harvest in half.
The short answer:
- Check for frost-heaved cloves at or above the soil surface — replant immediately to 2 inches deep
- Distinguish yellow leaf tips (normal frost burn) from full-leaf yellowing (nitrogen deficiency or rot)
- Pull one suspect plant and inspect the basal plate for soft tissue or white fungal growth
Sign 1: Frost Heaving
Freeze-thaw cycles push garlic cloves upward through the soil. A clove planted 2 inches deep in October may now sit at the surface with roots exposed. Exposed roots dry out within days.
Check the base of each emerging shoot. If the clove is visible at or above the soil line, press it back to 2 inches deep, firm the soil, and add 2–3 inches of straw mulch to stabilize temperature. If roots look dry and brittle, the clove may still survive — garlic is resilient — but it needs soil contact immediately.
Frost heaving is most common in heavy clay soils and beds without winter mulch. If multiple cloves heaved, that bed needs organic matter amendment and mulch cover for next fall’s planting.
Sign 2: Yellow Foliage — Normal vs. Problem
Yellow tips on otherwise green leaves are common in early spring and almost always harmless. According to the University of Minnesota Extension, garlic foliage tolerates temperatures down to about 25–26°F, but hard frosts in the low 20s burn leaf tips. This discoloration is cosmetic and does not affect bulb size.
Full-leaf yellowing is different. Uniform pale color on new growth in March signals nitrogen deficiency. Garlic is a heavy feeder, and after months of dormancy the soil’s available nitrogen is at its annual low. Cornell Cooperative Extension recommends side-dressing with blood meal, pelleted chicken manure, or a synthetic nitrogen source once spring growth begins — 1 cup of blood meal per 10 feet of row, scratched into the soil surface.
If yellowing comes with stunted growth, deformed leaves, or streaks and speckles rather than uniform color, the cause may be viral or nematode damage. Pull one affected plant and inspect the bulb. Firm cloves with white roots = nutrient issue. Soft or slimy cloves = rot (see Sign 3).
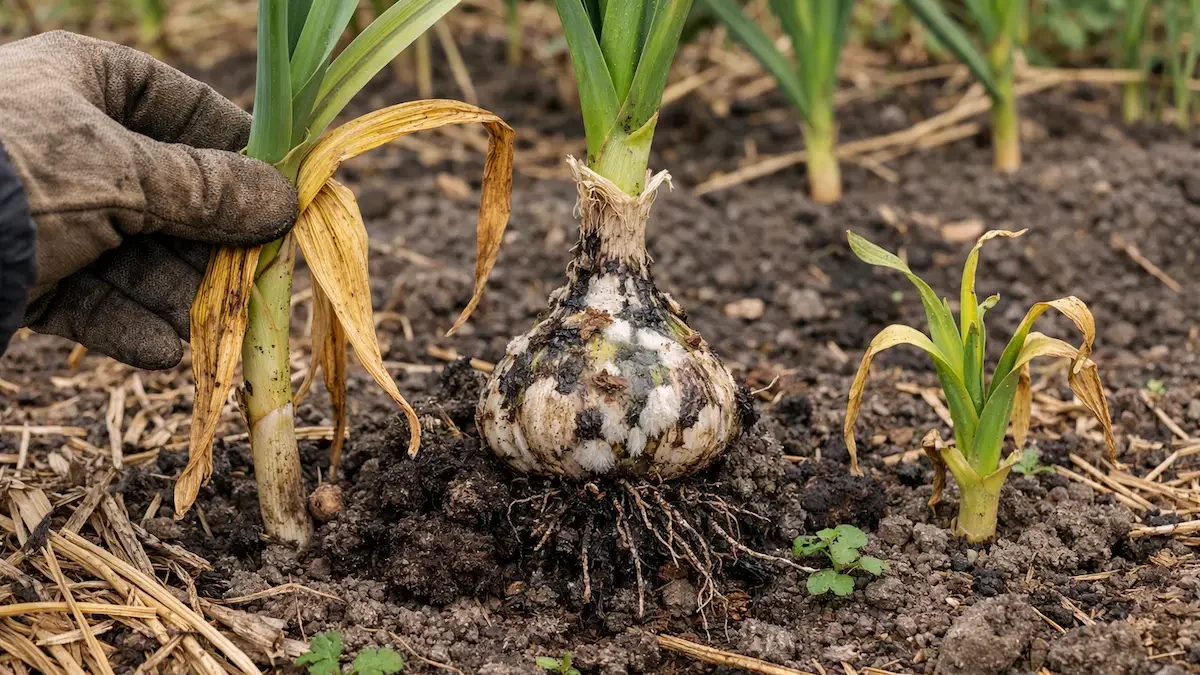
Sign 3: Soft Bulbs and Root Rot
Pull one plant from any area where multiple shoots look weak or excessively yellow. Examine the basal plate — the flat disc where roots attach.
Warning signs: roots that separate easily, brown or water-soaked tissue at the base, white fluffy fungal growth, or a sour smell. These indicate fusarium basal rot or white rot. According to the University of Maine Cooperative Extension, white rot can persist in soil for up to 40 years, making early identification critical.
Remove and destroy affected plants — do not compost them. Avoid planting any Allium species (garlic, onions, leeks) in that location for a minimum of 4 years. For remaining healthy plants, ensure drainage is adequate and avoid overwatering through spring.
What NOT to Do
❌ Applying nitrogen fertilizer to cold soil — Garlic roots cannot absorb nutrients efficiently below 45°F soil temperature. Fertilizer applied too early sits unused and encourages fungal growth. Wait until shoots are 3–4 inches tall.
❌ Leaving winter mulch packed tight over shoots — Protective in January, compacted mulch becomes a moisture trap in March. Pull it back to let soil warm and air circulate. Re-tuck loosely once growth is established.
❌ Ignoring one bad plant in a healthy row — A single plant with rot harbors pathogens that spread through soil moisture. Pull and inspect anything that looks significantly worse than its neighbors.
This Week (March 10–16)
- Walk the garlic bed and replant any heaved cloves to 2 inches deep
- Pull back compacted winter mulch from emerging shoots
- Assess leaf color: tips only = no action; full-leaf yellowing = plan nitrogen side-dress
- Pull one suspect plant and check the basal plate for rot
By April 10
- Side-dress with nitrogen once shoots reach 3–4 inches and soil warms above 45°F
- Reapply loose straw mulch (2–3 inches) for weed suppression
- Remove and destroy any confirmed rot-affected plants
- Plan spring bed preparation for crops following garlic harvest in July
Already starting seeds indoors? The March timing guide for tomatoes and peppers covers sowing dates by zone. And if the compost pile sat dormant since fall, the 3-step reactivation guide gets it producing before planting season.