
A cold frame adds 5–10°C to the microclimate around your plants at no ongoing cost. Built from a salvaged window and scrap timber, it costs almost nothing and can be assembled in an afternoon. It will start seeds in February, harden off transplants in April, and keep salad leaves going into December.
Quick Answer
What it does:
A cold frame traps solar heat during the day and holds it overnight, raising the internal temperature 5–10°C above the outside air. It protects against frost, wind, and heavy rain — extending the season at both ends by 4–6 weeks.
The simplest version:
Four pieces of timber or scrap wood forming a box, with a salvaged window or sheet of clear polycarbonate on top. No tools beyond a saw and screwdriver. Build time: 1–2 hours. Total cost from salvaged materials: nothing to a few pounds for screws.
The critical dimension:
The back of the frame must be higher than the front — slope 1 inch per foot of depth (about 2.5cm per 30cm). This angle faces the low winter and spring sun, maximising the light reaching plants inside, and allows rain to run off the lid.
According to University of Missouri Extension cold frame guide, recycled scrap lumber and old window sashes can be used to build effective cold frames, reducing costs to near zero. The standard glass sash for a cold frame is 90cm by 180cm (3 feet by 6 feet), and the frame should be built to match whatever lid is available.
Glass allows the most light transmission and holds heat the best. Clear twin-wall polycarbonate is a strong alternative if glass is not available — lighter, unbreakable, and still highly transparent. If neither is available, heavy-duty polyethylene plastic (4–6 mil) stretched over a timber frame works, though it degrades after a season or two under UV exposure.
Three Build Options — Ranked by Materials Needed
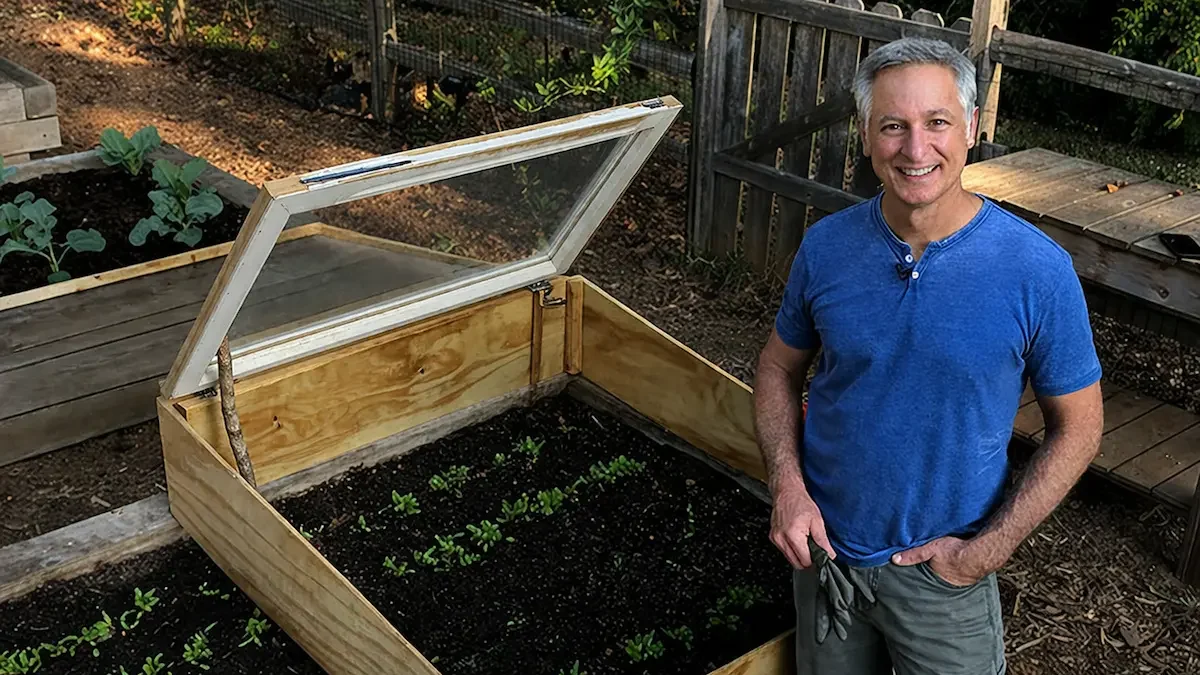
Option 1 — Timber Box and Salvaged Window
Free – £10
Build a four-sided box from scrap timber or reclaimed boards. Back height: 30–40cm. Front height: 20–25cm. Side pieces are cut at an angle to create the slope. Screw or nail the corners together, then hinge the salvaged window to the back edge.
A simple stick or rope can be used to prop the lid open for ventilation. This version is the most durable and can last for many years if built well. Use untreated hardwood or pressure-treated timber where possible, but avoid materials treated with creosote or other chemicals that can release harmful compounds in enclosed conditions.
Option 2 — Straw Bales and a Window
Free – £15
Arrange straw bales in a rectangular shape and lay a salvaged window across the top. Straw provides excellent insulation — often better than timber — and the height can be adjusted by stacking bales.
This is the fastest method and requires no tools. At the end of the season, the straw can be broken down and added to the soil, improving organic matter.
Option 3 — Polycarbonate Over Raised Bed
£5 – £20
Insert hoops made from pipe, conduit, or flexible rods into an existing raised bed and cover them with polycarbonate or heavy plastic. Secure the edges with clips or soil.
This option is lightweight, removable, and adaptable. It works particularly well if you already have raised beds and want a temporary extension rather than a permanent structure.
What to Grow — and the Ventilation Rule
A cold frame is most valuable at the edges of the growing season, not in the peak of summer.
In late winter and early spring, it allows you to start crops like lettuce, spinach, onions, and brassicas weeks earlier than open ground. In spring, it becomes a transition space for hardening off seedlings before transplanting.
During summer, it is usually opened fully or removed. In autumn, it extends production of fast-growing crops like salad leaves and radishes. Through winter, it protects hardy crops such as kale, mache, and parsley.
The most important operational rule is ventilation. According to Old Farmer’s Almanac cold frame tips, you should open the lid on any day when temperatures rise above about 7°C (45°F).
Overheating is a greater risk than cold. A closed cold frame in direct sun can exceed 40°C within a short time, damaging or killing seedlings. Open the lid on the side away from the wind, and close it again before evening to retain stored heat.
What to Do
Size the frame to match your lid, not the other way round. If you already have a window, build the structure around it. This keeps the project simple and avoids unnecessary cost.
Orient the frame so the lower front faces south. This ensures maximum sunlight capture during short winter and early spring days.
Vent on any sunny day above 7°C. Even in cold weather, sunlight can rapidly raise internal temperatures.
Seal gaps around the base using soil, mulch, or straw. Preventing cold air from entering is just as important as capturing heat.
Place water-filled containers inside during colder months. These absorb heat during the day and release it slowly at night, stabilising temperature swings.
Common Mistakes
Using old painted windows without checking for lead. Older paints may contain lead that can contaminate the growing environment. As noted by Old Farmer’s Almanac safety advice, it’s important to verify materials before use.
Failing to ventilate properly. The most common cause of failure is overheating, not frost.
Building without a slope. A flat lid collects water, reduces light, and eventually leads to damage or rot. A proper angle improves both durability and performance.